Greenpoint · Brooklyn
Your Greenpoint mirror has more than one center to consider.
By MetroGlass Pro ·
Plan this glass project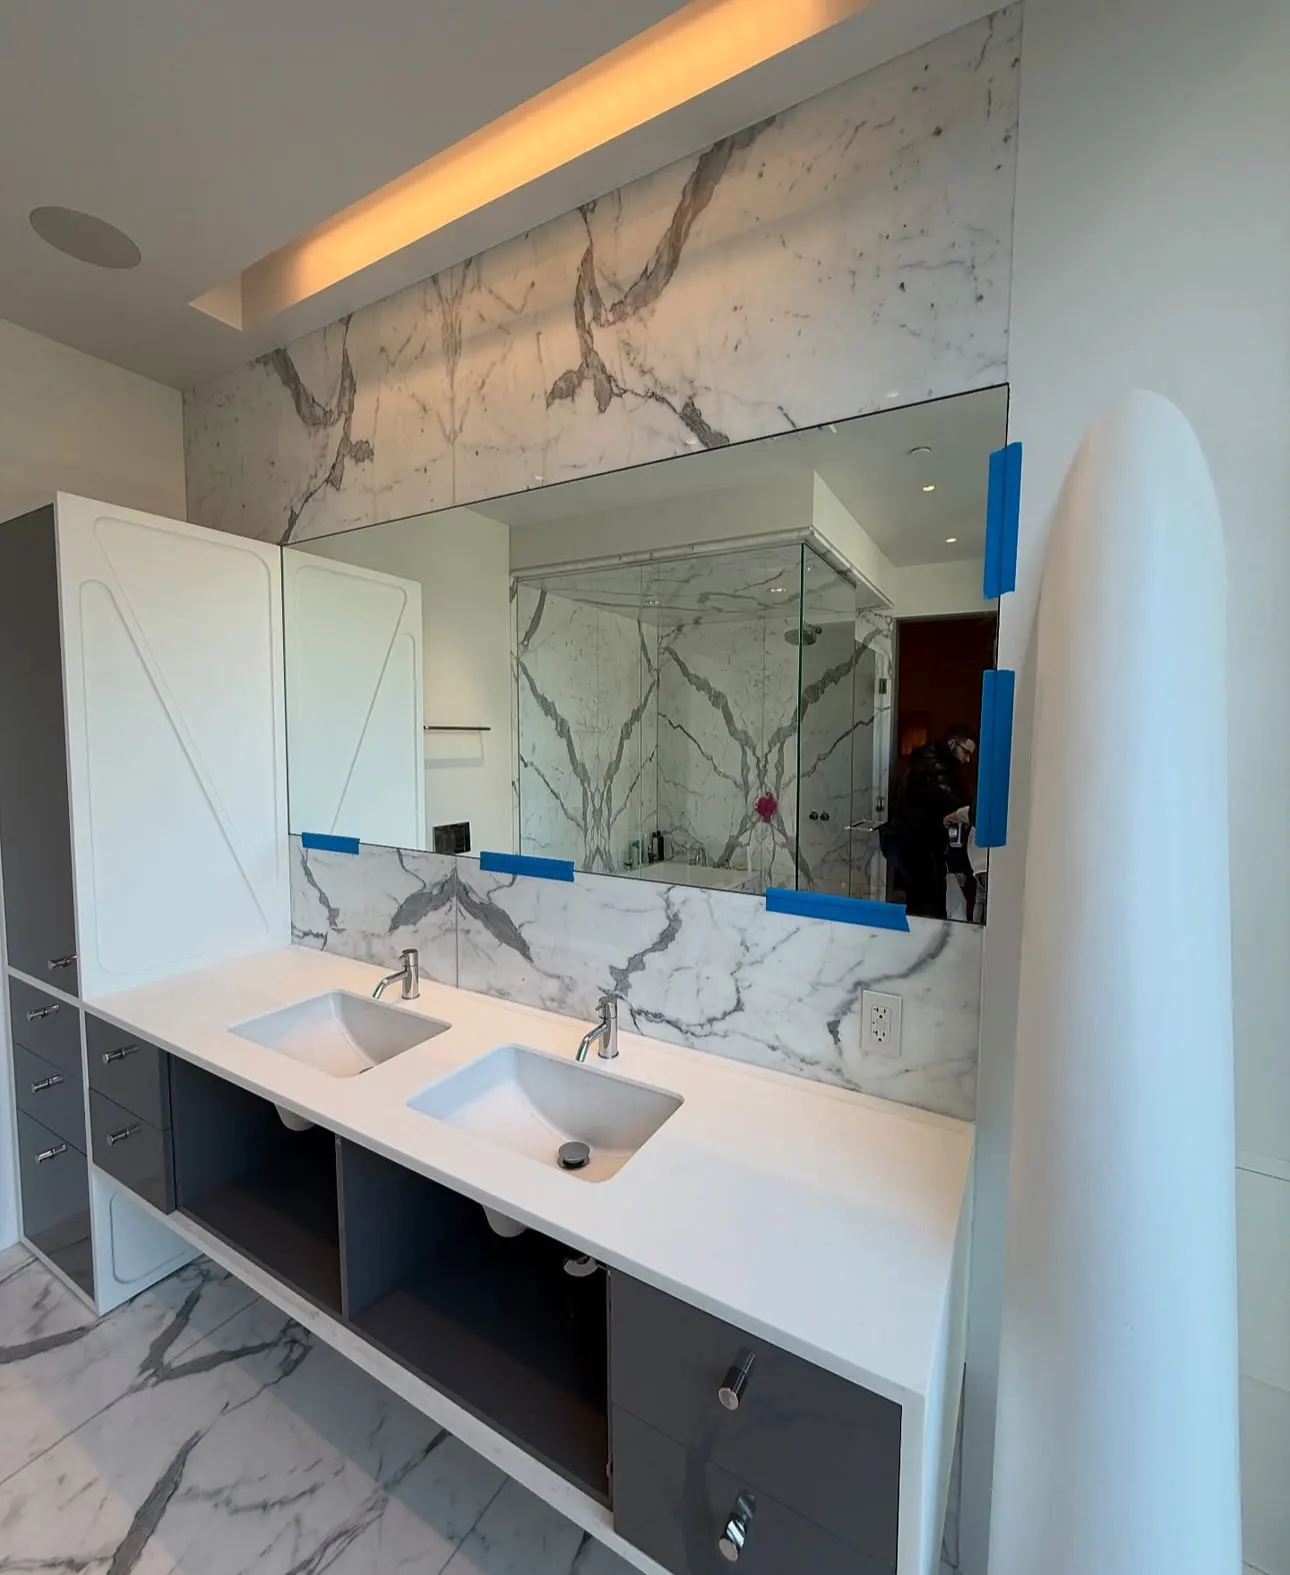
Two basins, a tall cabinet at one end, one long mirror. There is no single centerline doing all the work in this photograph. The countertop, available wall and reflected shower enclosure each pull your eye somewhere different.
If you are replacing a Greenpoint bathroom mirror, resist choosing its width from the cabinet alone. MetroGlass Pro’s gallery photograph shows a wide mirror spanning the double vanity, with a tall cabinet marking the left boundary and shower glass appearing in the reflection. It is a useful real arrangement to examine before deciding whether your room wants one continuous mirror, separate mirrors or a more generous strip of exposed wall.
Compare the mirror in the whole wall view. Then ask the wall and mounting review to support that choice.
Choose which centerline matters to the room
Start with a straight-on photograph that includes the full countertop, lights and both wall edges. Identify the center of the vanity and the center of the usable wall area separately. A tall cabinet, an offset basin or a switch can make those two positions different. Name the existing pieces you intend to keep so the comparison has real constraints.
In the photograph, the mirror brings the two basins into one long composition while the tall cabinet occupies part of the wall at the left. That observation does not tell you how the panel was sized or supported. For your room, compare a continuous span with smaller mirror areas on a marked photo. Look for an intentional relationship among edges instead of assuming that more reflected surface will always improve the room.
Review the reflection from both basins and the entrance
The shower enclosure reflected above the photographed basins brings another set of glass edges into the view. In your room, look from the position where each person uses the basin, then from the entrance. What becomes visible when the mirror gets wider or taller? Include open storage, neighboring glass and anything you would prefer to leave outside the view.
A taped outline or marked photograph can compare proportions before an order is placed. It does not demonstrate the optical quality of the finished mirror. The National Glass Association explains that viewing angle, distance and straight reflected lines can affect how distortion is perceived, and that installation can contribute. Keep a design comparison separate from judging a product defect or promising a perfectly undistorted reflection.
The largest attractive rectangle still needs a wall review
Once a proportion looks promising, show the existing wall surface and the old mirror edges. Name visible patches, loose finishes or moisture marks without diagnosing what is behind them. If removal will be needed before the receiving surface can be assessed, ask how that uncertainty affects the next visit and the point at which glass can be ordered.
Pilkington’s installation guidance discusses clean, dry receiving surfaces and the need to avoid stressing a mirror against uneven construction. That supports a separate wall and mounting review rather than treating a large mirror as a way to flatten a wall. The guidance does not identify the product or fixing method in MetroGlass Pro’s photograph. The selected mirror and installation system need their own assessment.
Ask the quote to preserve the proportion you selected
Send the favored outline, not just a final width in a text message. Say which lights, outlets, backsplash and cabinets stay. If separate mirrors are proposed, identify the intended relationship between their edges and the basins. If one wide panel is proposed, include the building access route in the discussion before treating it as ready to deliver.
Ask the proposal to distinguish old-glass removal, wall review, any preparation by another trade, the new mirror and the conditions for final sizing. A lighting change or wall repair can move the boundary you originally chose. A short, clear Greenpoint brief can keep the design decision visible while those practical questions are resolved, without turning a mirror estimate into an unspecified room renovation.
- Full vanity wall including both ends and lights.
- Preferred mirror outline and the fixtures to retain.
- Visible wall condition and the access route for a large panel.
Bring the actual room into the estimate.
For this project, useful photos show:
- Straight-on full vanity wall, lights and both wall edges
- Views from each basin and from the entrance
- Preferred outline, retained fixtures and visible existing mirror or wall condition
Tell us what you need.
Just the basics. Measurements and building details can come later.